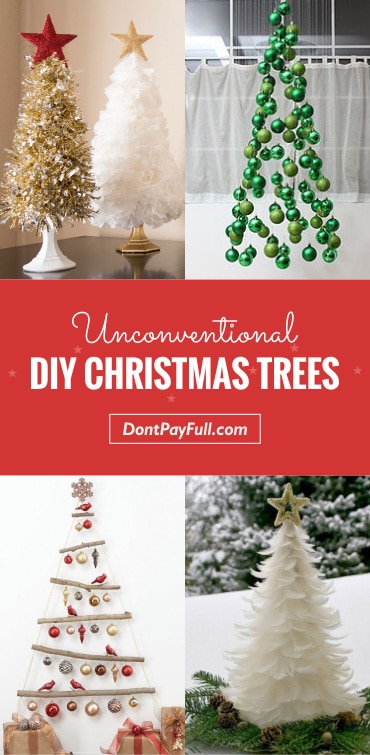
Hello, boys and girls! Have you been nice this year? If your answer is “define nice!” you may want to redeem yourself while you still can. How about you try to appease Santa with an unconventional DIY Christmas tree?
It’s eco-friendly, beautiful, easy to make and incredibly cheap (we love spending money, that’s no secret!). Let’s start our unconventional DIY Christmas trees countdown right now:
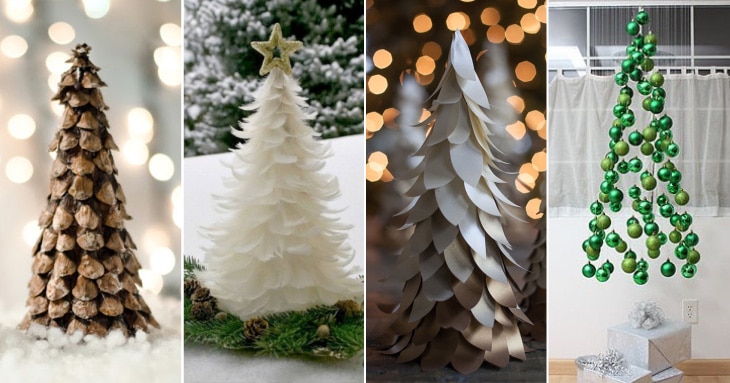
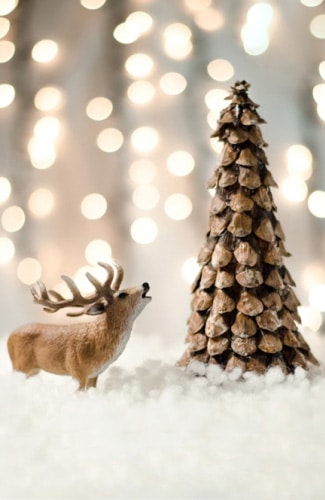
2. Pinecone Tree
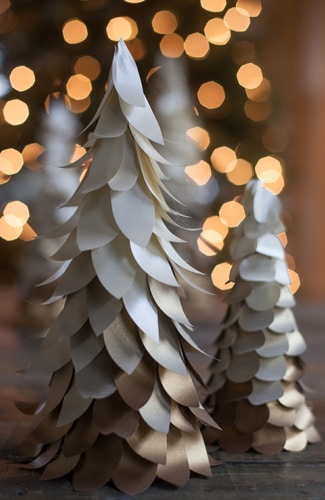
3. Feather Tree
4. Floating Tree
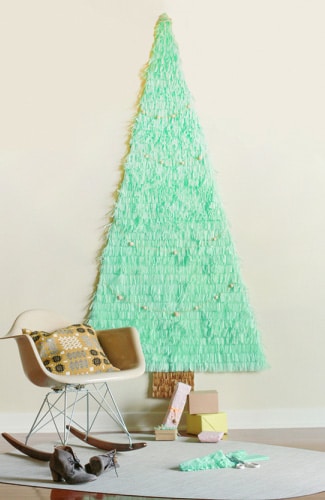
5. Tulle Tree
6. Recycled Paper Tree
8. Greetings Tree
9. Paper Tree
10. Tissue Tree
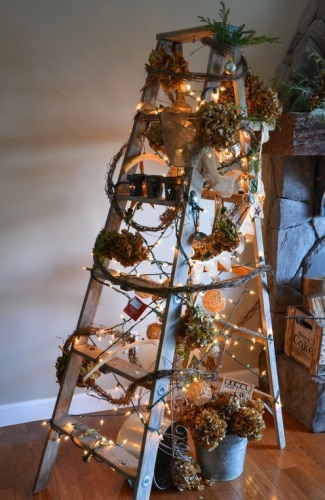
11. Ladder Tree
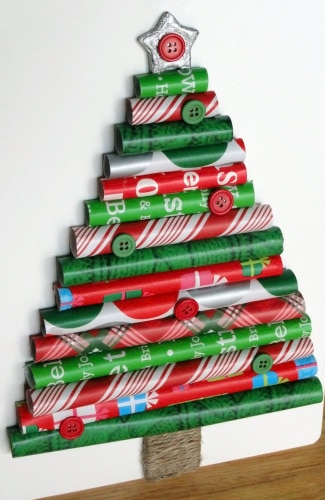
12. Wrapping Paper Tree
14. Stacked Book Tree
15. Stick Art Tree
16. Ornament Tree
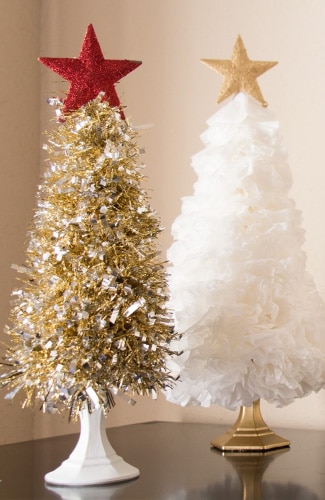
Tinsel Garland and Coffee Filter Tree
Materials: paper or Styrofoam cone, coffee filters, tinsel garland, candle holders, star ornaments, scissors, glue gun, craft glue.
Create your coffee filter tree first. Take your Styrofoam or paper cone and glue coffee filters to it after previously putting a pencil in the center and bringing the sides down to make everything look like a closed umbrella.
Remove the pencil and twist the thinner end until you get a flower-looking shape. Glue onto the base of your cone. Repeat until you reach the top.
For your tinsel garland, apply glue on your cone and wrap the garland around it from the top to the bottom. Add a start on top of each tree and a candle holder as the bottom and you are done!
See the tutorial here!
youtube.com
2. Pinecone Christmas Tree
Materials: pinecones, glue, Styrofoam or paper cone, a little plastic star.
Start by removing the petals from your pinecone one by one. Then, start gluing them onto the cone, starting from the bottom and making your way up to the top. You can either use craft glue or a hot glue gun, just make sure not to leave any white traces.
If you leave any, you can paint it over in a lovely color like green, silver or yellow. When you are done, place your star on top and you are done!
You can also add little sequins here and there to resemble Christmas lights, if you want.
More details and a complete tutorial can be found at ifallinchocolate.com!
You can find another model here.
ifallinchocolate.com
3. Feather Christmas Tree
Materials: white turkey feathers (sort them by size: short, medium, long), hot glue gun, Styrofoam cone, popsicle sticks, bamboo skewer, wire cutters, scissors, a star, spray adhesive, glitter.
If you want the super easy version, use only the cone, the feathers, some glue and a star. Start by gluing the longest feathers to the lower end of the cone.
Do this for 1/3 of the cone, then glue the medium size feathers for another 1/3 of the cone and then continue with the shortest feathers. Glue your star on top and you are done!
You can use your adhesive spray on your tree and then sprinkle some glitter to make your ornament more opulent.
The tutorial can be found at marthastewart.com!

marthastewart.com
4. Floating Tree
Materials: round steamer rack, lightweight jack chain, 100 ornament hooks, 100 tree ornaments.
Cut your jack chain in pieces of 19”-21”, then stick them to your steamer rack edge and interior, creating concentric circles. You can use floral wire for this process. Now, place those ornament hooks onto your Christmas ornaments and get ready for the final step, which is the placement.
Place 20-30 ornaments on the outer circle of your steamer system, at the same height. Leave a few inches and place ornaments on the circle next to this one, the same height. Repeat this until you have reached the center of your installation- there you can place your final ornament (which can be a star).
The step-by-step tutorial is at notmartha.org!

notmartha.org
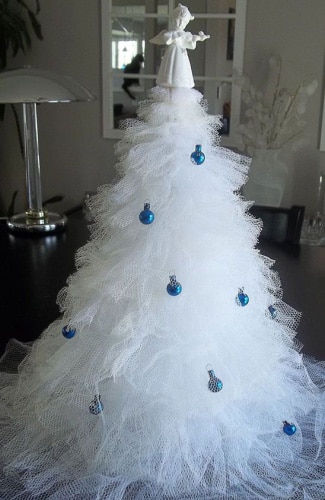
5. Tulle Tree
Materials: tulle (2-3 yards), craft glue, sewing thread (a color that matches your tulle’s), Styrofoam or paper cone, lightweight Christmas ornaments.
Start by cutting your tulle into strips of different sizes. Start with a long strip of 11 inches, another one of 10 inches and so on until your last one is 1 inch wide.
Now, take a needle and thread and run it through the longest edge of every strip. Pull the material together until it gets all wrinkly and like a ruffle and then you can glue it onto your cone, starting from the lowest point and working your way up while adding narrower and narrower strips of tulle. You can top your Christmas tree with a plastic star and decorate it with very small and lightweight ornaments.
See the tutorial at ebay.com!
ebay.com
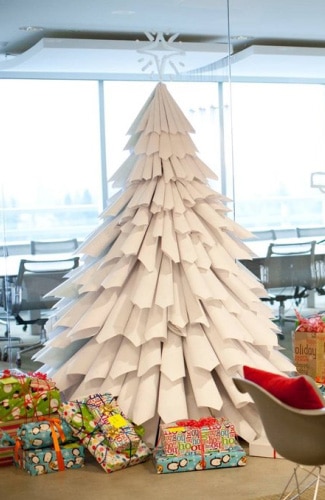
6. Recycled Paper Tree
Materials: foam board, cardboard, hot glue gun, recycled paper, scissors.
Start by creating the base: cut two identical isosceles triangles out of the foam board and then cut one of them in the center lengthwise but not all the way through, then insert the other triangle through the newly-formed crack.
Start gluing small triangles to resemble stairs from the bottom to the top and you can now proceed to adding the paper. Take each sheet of paper and roll it into a cone, flatten it gently and then glu it onto the base. Start from the bottom and work your way up.
You can see the entire tutorial and more details at popsugar.com.
popsugar.com
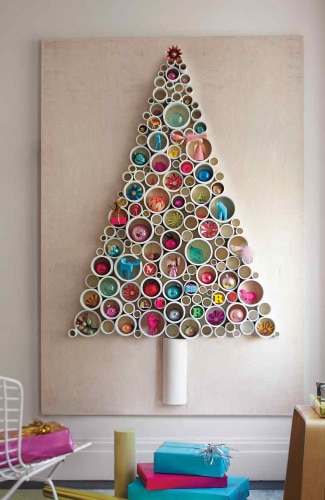
7. PVC Pipe Tree
Materials: paint (optional), plywood (4 by 6 feet), pipe cutter, PVC pipes of different widths (the more diverse, the better), painter’s tape, and epoxy.
Start by hanging your plywood sheet on the wall and then draw an upside down triangle right in the center of it. Using your pipe cutter, cut 2 inch slices of pipe, then place them onto your plywood with five-minute epoxy.
Make sure you mix all the widths when doing this. Continue until you’ve filled in the triangle shape and then create the base of your tree. Take a 5-6 inch pipe and cut it in half lengthwise. Glue one of the halves perpendicularly to your tree’s base and you are done. Now you can place ornaments inside every pipe hole.
A more detailed tutorial can be found at marthastewart.com!
marthastewart.com
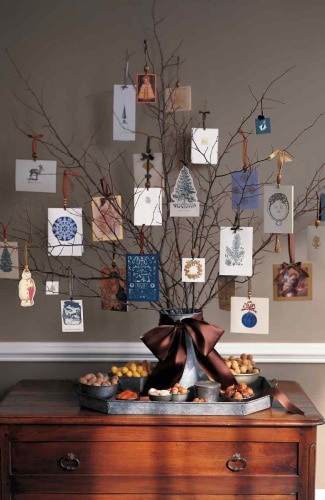
8. Greetings Tree
Materials: dried branches, bucket or vase, a collection of ribbons (same size, different shades), ¼-inch hole punch.
Start by placing your dried branches in a bucket or vase (you can add small river rocks to hold them in place).
Poke a hole through every closed card and run a few inches of ribbon through it, then use the ribbon to attach your card to the dried branches.
Repeat this until you’ve attached all your cards and enjoy your new Christmas tree.
For more details and a step-by-step tutorial, visit marthastewart.com!
marthastewart.com
9. Paper Christmas Tree
Materials: colored paper (3-4 shades of the same color), Styrofoam or paper cone, craft glue, tree toppers, scissors, circle and star template, depending on your choice.
Start by using your template to draw as many circles or stars as you can on your paper then cut them out and curl each one of them with the back of your scissors. Start gluing your darkest shapes to the bottom and use lighter and lighter colors as you work your way up.
You can go for any shape you want: leaves, hearts, diamonds etc. also, try to buy metallic paper if you can find it.
The final results and more information can be found at liagriffith.com.
liagriffith.com
10. Tissue Tree
Materials: foam board or plywood sheet (4 by 6 feet), fringe scissors, regular scissors, tissue paper (30-40 sheets), white duct tape, craft glue, picture frame hook.
Start by attaching the picture frame hook to your foam board, and then draw an upside down triangle in the middle of it, like you did at #7.
Cut identical strips of tissue and create fringes in all of them, then you can attach every strip to your board, inside the triangle. Start from the bottom and work your way up, but make sure every new layer overlaps the previous one by half its width. Continue until you reach the top. You can add glitter or lightweight ornaments here and there if you want.
Check out the whole tutorial at curbly.com!
curbly.com
11. Ladder Christmas Tree
Materials: hydrangeas, twiggy garlands, a few greens, Christmas lights, a double ladder.
This is the easiest unconventional Christmas tree you could possibly make.
Open your ladder on an angle of 45 degrees, then start wrapping and adding your other materials on it, starting with your lights, then the greens, the twiggy garland and the hydrangeas.
Plug in your lights and you are one! You can also decorate your tree with regular ornaments, pinecones (here’s a tutorial to help you out with that) or acorns (here’s another article for you).
For a step-by step tutorial, go to funkyjunkinteriors.net!
funkyjunkinteriors.net
12. Wrapping Paper Christmas Tree
Materials: wrapping paper, foam board, scissors, craft glue, twine, hot glue, wood star, glitter, and buttons.
Start by cutting rectangles of wrapping paper in different sizes (same width, different length). Roll each piece lengthwise until you get a cylinder.
Glue the edge in place with craft glue and then glue every cylinder on your foam board, from the longest to the shortest.
Leave 2-3 inches between your cylinders. Use the glue gun to stick your wood star on top, glue the buttons to resemble Christmas ornaments, sprinkle some glitter and you are done.
More at alittletipsy.com!
alittletipsy.com
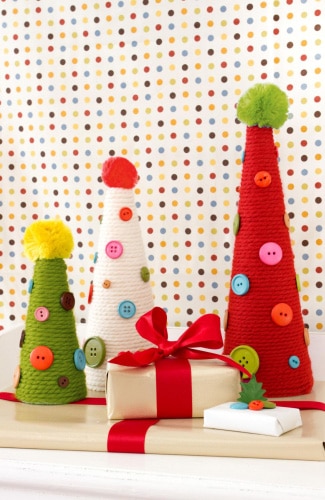
13. Yarn Christmas Tree
Materials: foam cones, different colors of yarn, buttons of many sizes and colors, hot glue, pom-poms, and scissors.
Use the hot glue to stick the loose end of the yarn to the bottom of the cone then continue wrapping it around until you reach the top.
You can alternate the yarn colors if you want. Now, attach the buttons to look like Christmas ornaments and the pom-pom as a tree topper. You can add glitter and faux pearls, if you want.
And the good thing is you can create as many trees as you want, as colorful and as big as you want, since yarn is really not that expensive.
For a step-by-step guide and tutorial, you can visit hgtv.com!
hgtv.com
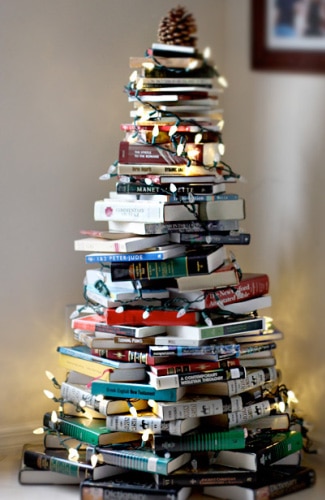
14. Stacked Book Christmas Tree
Materials: at least 80 books, Christmas lights, a tree topper. Start by placing a few books in a circle on the floor. Then, add another layer of books on top of it, like a smaller circle.
Continue with smaller and smaller circles of books until you reach the top. Now, take your Christmas lights and wrap them around your unconventional Christmas tree like you would do with a regular tree.
And it doesn’t matter if your books are old or new, as long as they are sturdy
. The last touch is the tree topper: you can go for a pinecone, a star or an opened book, for example.
The tutorial can be found at familysponge.com!
familysponge.com
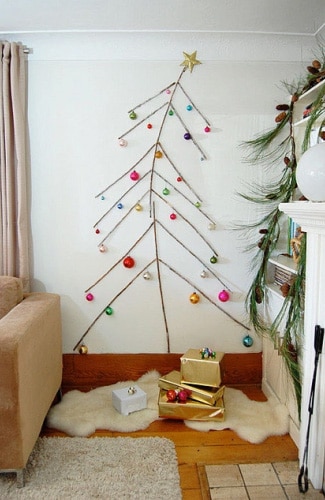
15. Stick Art Christmas Tree
Materials: wooden sticks, double-sided tape, a star, lightweights Christmas ornaments. Place your longest stick vertically on the wall using double sided tape.
Then, add the longest 2 sticks to for the bottom, horizontally. Leave a few inches and place your next layer of sticks, until you get to the top.
Now, you can place the ornaments here and there and finish off your project with a beautiful star.
You could use hot glue, but that would ruin your walls (lesson learned the hard way!). Do not add glitter, since it would be a nightmare to scrape it off your wall. Keep everything nice and simple!
Go to theartofdoingstuff.com to see more instructions!
theartofdoingstuff.com
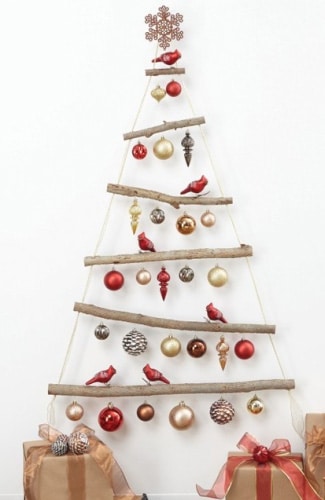
16. Ornament Tree
Start by cutting your branches making sure they are different lengths. Drill hole on both ends of every branch and start hanging your ornaments on each one of them. When you are done, grab your ribbon and run it through the holes made in your shortest branch, leaving room to he hung on the wall.
Then, run your ribbons through your next branch (lengthwise), and so on until you finish with the longest branch you have.
The final result should look like the one found at marthastewart.com!
marthastewart.com
Which one of these trees is your favorite? Would you choose an alternative DIY Christmas instead of a natural one? Comment below and let us know!
Pin it for later: